


DIY Framing Tips for Art Prints: Affordable & Stylish Solutions
Transforming your living space with beautiful art prints doesn’t have to break the bank. While professional framing services can charge hundreds of dollars per piece, DIY framing offers a budget-friendly alternative that still achieves polished, stylish results. Whether you’ve just purchased a special art print, have a collection gathering dust in tubes, or found unique pieces with non-standard dimensions, learning to frame your own artwork empowers you to display your treasures without the steep price tag. For more creative ways to refresh your space, check out these retro wall art ideas and decor tips.
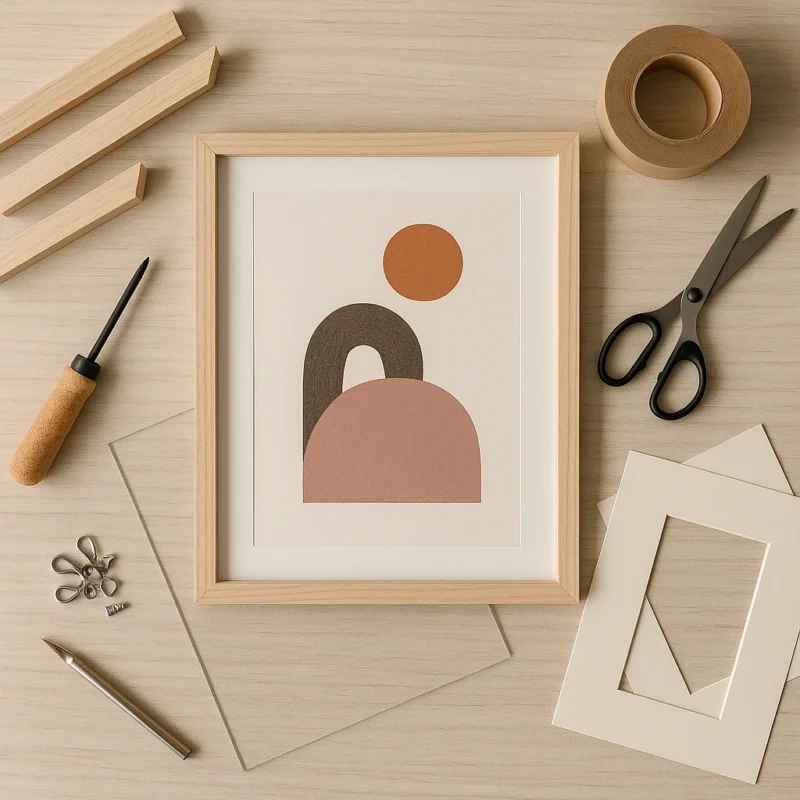
In this comprehensive guide, you’ll discover essential tools, step-by-step techniques, and creative solutions for framing art prints at home. From handling standard sizes to tackling unusual dimensions, we’ll cover preservation methods and stylish display options that rival professional results—all while keeping your wallet happy.
Essential supplies and tools for DIY framing
Before diving into your first framing project, gathering the right materials will set you up for success.
Fortunately, most supplies are accessible at local craft stores or online retailers.
Basic supplies for beginners:
- measuring tape or ruler (preferably metal with clear markings)
- sharp scissors or craft knife with cutting mat
- acid-free mounting tape or corners
- microfiber cloth for cleaning glass/acrylic
- framing hammer and small nails or points
- picture hanging kit (wire, D-rings, or sawtooth hangers)
- level for hanging
For more advanced projects, consider investing in a mat cutter, point driver, and corner clamps if you plan to make your own frames.
The quality of materials directly impacts both the appearance and preservation of your artwork. Professional framers emphasize using acid-free, archival-quality materials to prevent yellowing, fading, and deterioration. Lignin-free backing board and UV-protective glass or acrylic are worth the slightly higher cost for valuable or sentimental pieces.
Where to buy affordable frames and mats
- IKEA – Offers the RIBBA frame series in various sizes at budget-friendly prices
- Target/Walmart – Regular sales on basic frames in standard dimensions
- Michael’s/Hobby Lobby – Frequent 40-50% off sales on frames and custom mat cutting services
- Thrift stores – Hidden gems with solid wood frames (ignore the artwork inside)
- Amazon – Wide selection of frames and bulk packs for gallery walls
- Frame Destination/MatboardPlus – Online custom mat cutting services at reasonable prices
Once you’ve selected the perfect frame, you’ll need beautiful artwork to display. Browse art prints by theme to find pieces that complement your space and personal style.
Framing standard vs non-standard size art prints
Understanding the difference between standard and non-standard sizing helps determine your framing approach and potential costs.
Standard sizes and their benefits:
In North America, common frame sizes include 5×7″, 8×10″, 11×14″, 16×20″, 18×24″, and 24×36″. Working with standard dimensions offers significant advantages—pre-made frames and mats are readily available and much more affordable than custom options.
When purchasing art prints, many artists offer standard sizes specifically to make framing easier for their customers. If your print matches these dimensions, simply select a frame of the same size or slightly larger if you want to add a mat.
Solutions for non-standard sizes:
Many art prints, especially vintage posters, limited editions, or international prints, come in non-standard dimensions. Rather than paying for expensive custom framing, consider these alternatives:
- Mat to standard size – Use a larger standard frame with a custom-cut mat to accommodate your oddly-sized print
- Floating mount – Display your print centered on a larger backing board, creating a floating effect within a standard frame
- Trim the print – If white borders exist and aren’t part of the artwork, carefully trim to fit a standard frame (only if the image won’t be compromised)
- DIY custom frame – Build a simple frame using wood strips cut to your exact specifications
Creative solutions for odd sizes
For art prints with unusual dimensions, consider these stylish alternatives to traditional framing:
- Magnetic poster hangers – Wooden or metal strips that clamp the top and bottom of your print
- Clipboard display – Industrial-chic option using oversized clipboards to hang prints
- Dowel hanging – Attach wooden dowels to the top and bottom of your print for a hanging scroll effect
- Binder clips with wire – Minimalist approach using black binder clips and hanging wire
When considering non-traditional display methods, explore Bauhaus geometric print inspiration for ideas that embrace clean lines and creative mounting solutions.
Step-by-step: how to frame art prints at home
Follow these detailed instructions for professional-looking results when framing your artwork at home.
Preparing your workspace and materials:
- Clear a clean, flat surface with good lighting
- Wash hands to avoid transferring oils to the print or glass
- Gather all necessary materials before starting
- Carefully unpack your frame, checking for any defects
Matting your artwork (optional but recommended):
- Measure your artwork precisely and determine desired mat width (typically 1.5-3 inches)
- For DIY mat cutting, draw your measurements on the back of the mat board and cut using a mat cutter with 45° blade
- For pre-cut mats, select a size with an opening slightly smaller than your artwork (usually ⅛” smaller on each side)
- Choose a mat color that complements your artwork—neutral whites, creams, and soft grays enhance rather than compete with your print
Mounting your print:
- Position your artwork centered in the mat opening
- Create archival hinges using acid-free tape folded into small tabs
- Attach hinges to the top edge of the artwork and then to the back of the mat
- This “hinging” technique allows the paper to expand and contract with humidity changes
Assembling the frame:
- Clean the glass or acrylic with a microfiber cloth (never spray cleaner directly on it)
- Layer components in this order: frame, glass, mat with attached artwork, backing board
- Secure backing with frame points, flexible tabs, or the frame’s existing hardware
- Attach hanging hardware—D-rings placed at the 1/3 mark on each side work best
- Add wire if desired, or use sawtooth hangers for lighter pieces
Quick-frame hacks for a budget
Need to frame artwork with minimal investment? Try these clever alternatives:
- Upcycled thrift store frames – Strip, sand, and paint for a fresh look
- Bulldog clips and push pins – Clip artwork and hang from decorative push pins for an industrial vibe
- Document frames – Inexpensive clip frames from office supply stores work for smaller prints
- Washi tape frames – Create colorful “frames” directly on the wall using decorative tape
- CD cases – Perfect for mini 4×4″ prints
Stylish ideas to make your framed art print stand out
Elevate your DIY framing with these designer-approved techniques that add visual interest and personality.
Mat techniques:
- Double matting – Layer two mats with the bottom one extending ⅛” to ¼” for a subtle accent color
- Oversize matting – Make a small print appear more substantial with a wide mat (4-6 inches)
- Off-center mounting – Position artwork slightly lower than center for a museum-like presentation
- Colored mats – Choose a subtle hue that pulls a secondary color from your artwork
Frame styling:
- Mix and match – Create a cohesive gallery wall using frames in different styles but similar finishes
- Paint existing frames – Transform basic black frames with metallic paint or bold colors
- Distressed finishes – Add character to plain wood frames with light sanding and staining
- Frame stacking – Place a smaller frame inside a larger one with creative spacing
Arrangement ideas:
- Salon style – Group various sizes in an organic arrangement (trace paper templates to plan placement)
- Grid formation – Create impact with identical frames arranged in perfect alignment
- Leaning display – Place framed art on shelves or ledges for a casual, easily changeable display
- Statement piece – Frame one oversized print as a room focal point
Professional designers often recommend leaving at least two inches between frames when creating groupings, and maintaining consistent spacing throughout your arrangement for a polished look.
Preservation & longevity: framing for archival protection
Proper framing does more than make artwork look good—it protects your investment from environmental damage.
Archival considerations:
- Acid-free materials – Standard cardboard and paper contain lignin that yellows and damages artwork over time
- UV protection – Specialized glass or acrylic filters block harmful ultraviolet rays that fade pigments
- Air gap – Prevent artwork from touching glass to avoid condensation damage and sticking
- Reversible techniques – Use methods that allow artwork to be safely removed if needed
When to DIY vs. professional framing:
Consider professional framing services for valuable art, original works, sentimental pieces, or items requiring specialized preservation. For decorative prints, reproductions, and personal photos, DIY framing is typically sufficient when using archival materials.
Environmental considerations:
Even well-framed artwork can suffer damage from poor environmental conditions:
- Avoid hanging art in direct sunlight
- Keep artwork away from heat sources like fireplaces and radiators
- Maintain moderate humidity (40-55%) to prevent warping and mold
- Bathrooms and kitchens pose risks due to moisture and temperature fluctuations
Gallery and museum professionals recommend regular inspection of framed artwork, looking for signs of condensation, insect activity, or color changes that might indicate preservation issues.
Framing oversized or unusual artworks
Large-format prints present unique challenges but can make dramatic statements when properly displayed.
Options for oversized prints:
- Sectional framing – Divide very large works into diptychs or triptychs using multiple frames
- Poster rails – Sleek aluminum or wooden rails at top and bottom support large prints without traditional frames
- Canvas stretching – Transfer paper prints to canvas for a frameless gallery-wrapped appearance
- DIY large frames – Construct simple frames using wood trim and corner brackets
Handling special formats:
- Panoramic prints – Custom-cut mats with thin frames prevent overwhelming the artwork
- Square format – Add visual interest with circular or floating frames
- Odd shapes – Float mounting on larger backing board preserves unique edges
Transportation and hanging considerations:
Large framed pieces require additional planning for safe hanging:
- Use two people when handling oversized frames
- Install proper wall anchors rated for the weight
- Consider French cleats for secure, level mounting of heavy pieces
- Leave adequate space around large artwork (minimum 6-8 inches) for visual breathing room
Browse our latest art print releases for your next framing project and practice these techniques with fresh, inspiring imagery for your walls. With careful material selection and thoughtful presentation, your DIY framed art prints can achieve professional-quality results at a fraction of the cost. The techniques in this guide give you flexibility to showcase everything from small illustrations to oversized statement pieces while preserving their beauty for years to come. Remember that framing is both functional protection and artistic expression—don’t be afraid to experiment with creative approaches that reflect your personal style while keeping your artwork safe.
Frequently asked questions
What is the cheapest way to frame art prints at home?
Thrifted frames, poster hangers, and DIY wood frames are affordable; use acid-free tape and mats for quality results. Document frames from office supply stores and repurposed frames from secondhand shops offer the most budget-friendly options while still protecting your artwork.
How do I frame prints that don’t fit standard frames?
Use custom-cut mats or backing paper to adapt art to standard frames, or try floating/magnetic poster frames for unique sizes. You can also create a floating effect by mounting the print on a larger backing board within a standard frame, allowing the artwork’s edges to remain visible.
What’s the best way to protect art prints from fading?
Use acid-free materials, UV-protective glass, and avoid direct sunlight or humid environments. Proper mounting techniques that allow paper to expand and contract with humidity changes will also prevent warping and damage over time.
Can I frame art prints without a mat?
Yes! Consider floating frames, clip frames, or mounting directly, but ensure the artwork doesn’t touch the glass. Using spacers (clear plastic pieces placed between the glass and artwork) creates necessary separation when framing without mats.
Where can I buy affordable frames and custom mats?
Craft stores, online retailers, and art supply shops offer budget-friendly options. IKEA, Target, and Walmart carry standard sizes at reasonable prices, while Michael’s and Hobby Lobby frequently offer 40-50% off sales on frames and mat-cutting services.